
After countless hours sailing, testing and competing in the J/70 One Design, North Sails has updated our tuning notes and tips in an effort to get sailors and teams up to race winning speed quickly with our World Championship winning sails! As we learn more about the J/70, or any other One-Design Class, new information regarding setup, tuning and trimming techniques will be updated online at northsails.com. Also, sign up online for our North Sails email updates and receive all J/70 news and updates directly by email. And as always, contact your North Sails Expert for all the most up to date information and for help tuning your boat.
For answers to your speed and boat handling questions, read our tips and tricks in the J/70 Speed Guide.
The J/70 is a design that incorporates many decades worth of great ideas and puts them into a 22’ package of fun and speed. Incorporating the speed and handling of a top tier sport boat with the stability and reliability of a performance keelboat. The J/70 creates a sailing experience that accommodates all ages, abilities and sailing appetites. We expect to see the J/70 class crown a diverse group of champions in the coming years. Let North Sails help you reach your competitive goals!
SAIL CARE
Properly caring for your North Sails will prolong the life of the sails. When storing your sails, keep them clean, dry, out of direct sunlight and away from areas of extreme heat. Rolling the mainsail and jib when they are not being used and folding your spinnaker (instead of stuffing it in a bag) will help all of your sails remain wrinkle free and last much longer. Whenever you’re rolling or unrolling your sails, be sure to keep adequate tension fore and aft from the leech and luff to avoid creasing in the cloth. In addition, releasing the tension on the full-length battens in the mainsail, for storage, will increase the life of the sail.
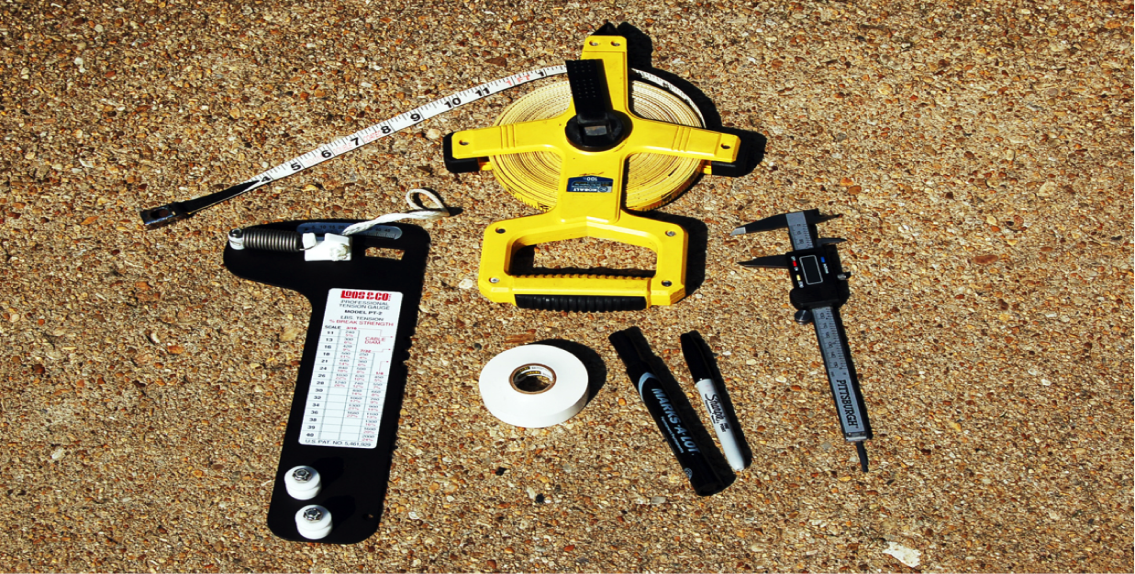
TUNING TOOLS
Some basic tools are required to accurately set up and tune your J/70 mast. These include: 50’ or longer Steel Measuring Tape [no stretch], PT-2 Loos Tension Gauge, Calipers, Permanent Marker and Electrical Tape. Each of these tools will be mentioned in this tuning guide and will aid in the proper tuning of your mast.
Another important setup tool is the use of reference marks. MARK EVERYTHING! While this sounds basic, marking settings can make it much easier to repeat your setup and tuning on the water. Mark your sheets, bowsprit out line, tack line, halyards and other controls to make settings repeatable and more accurate.
While we’ve done our very best to make this Tuning Guide reflect the latest and greatest tuning numbers, please keep in mind that every boat and mast can be a little different and everyone’s sailing styles can vary as well. While the guide will definitely get you going fast, specific testing will be required to fine tune your boat to match your style and the conditions you most often sail in.
J/70 MAST SETUP & TUNING
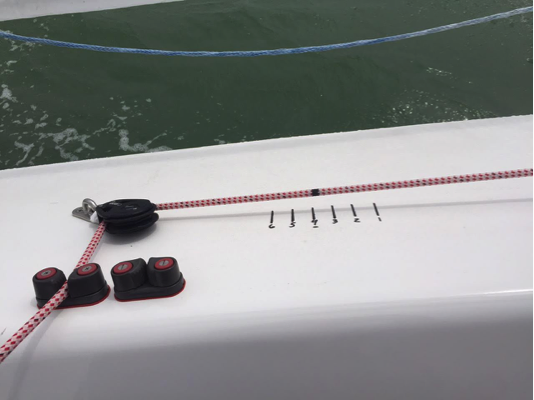
SPREADERS TRIM MARKS
Before stepping the mast, mark the spreaders with tape stripes to use as a reference when trimming the jib. These marks will indicate the location of the leech of the jib when it is trimmed for upwind sailing. Measuring from the mast, along the aft edge of the spreader, put tape stripes at 18”, 20” and 22” with the measured edge of the stripe closest to the mast.
INITIAL RIG SETUP
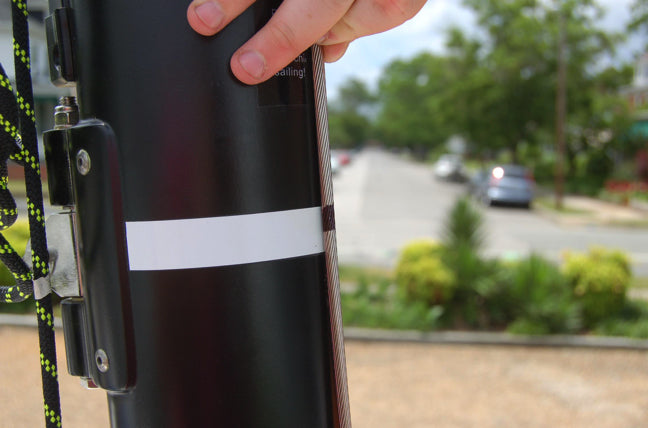
1. Measure Headstay Length (Mast Rake)
With the mast up and rig at base, attach the spinnaker halyard to the bowsprit to support the mast, allowing the headstay to be disconnected from the furler drum. Then pull the headstay taut down the front face of the mast and make a mark on the headstay (Use either a marking pen or piece of tape) corresponding to the top of the white band around the mast near the gooseneck. After marking the headstay, reconnect it to the furler drum and measure from the mark you made down to the center of the pin at the bottom of the headstay (including any toggles). Note – this is not the pin in the furler but the pin that connects the headstay to the further (it’s the upper pin). We recommend this measurement to be 56”(1425mm) for an all purpose setting that has proven to deliver championship speed across the spectrum of conditions. Some fast teams adjust this number upwards of 1” (25.4mm) to accommodate for factors such as total crew weight, sailing conditions, and personal preference. Generally speaking, a shorter rake may be faster in heavier wind while a longer rake may perform better in lighter wind. All things equal, a longer rake should give the boat more weather helm, while a shorter rake will reduce weather helm.
2. Center the Mast Side to Side
To aid in centering the mast laterally in the boat, place a pencil mark 96” (2440mm) back from the stem fitting (bow) on the rail of each side of the boat. Make sure your lower shrouds are loose. Next, hoist a tape measure on the jib halyard, secure the halyard and measure to the pencil marks you made on the rail. Adjust the Upper Shroud lengths until the measurement is even on each side of the boat. This indicates your mast is centered. Sight up the back of the mast to ensure the mast is straight. If it is not straight, check to make sure your boat is level on the trailer or in the water. If you must choose between straight or centered, choose straight.
NOTE: The tape measure only needs to be hoisted a short distance since the measurements are relative to each other and the actual lengths are not important.
3. Set the Base Shroud Tension
Set the base shroud tension with your backstay detached at the transom. The base tension for the upper shrouds is 19 and the lower shrouds is 9 on the PT-2 gauge. While adding tension to get to the base setting, occasionally sight up the sail track on the aft side of the mast to ensure the length of the spar is straight. If the mast track has any side bend or curve, adjust the shrouds to bring the mast into column.
4. Checking for proper Pre-Bend
After setting the shroud tensions at 19 on the uppers and 9 on the lowers, check that the mast has the proper pre-bend (aft bend) by pulling the main halyard down taught to the bottom of the mast track near the gooseneck (see pic). The pre-bend distance between the back of the mast track and the front of the main halyard (just above spreaders) should be between 2” and 2.5” (56mm-63.5mm).
Your boat may require slightly different tensions at base to achieve this pre-bend range. If your pre-bend is too much, try slightly tighter lower shrouds compared to uppers. If you don’t have enough pre-bend, try slightly tighter upper shrouds compared to lower shrouds. With the upper shrouds at 19, many fast boats are in a range of 6-10 on the lowers on the PT2 to achieve this pre-bend. As you change your mast rake, you may also have to adjust your lower shroud tensions to achieve this pre-bend.

5.Use Calipers to Check Base Settings
After setting the base rig tensions and checking the side-to-side center position of the mast, it is a good idea to use calipers to measure the distance between the studs on the shrouds and headstay. This measurement can help you get the rig back to base setting more easily, especially if unsure of the turns or tensions while on the water.
J/70 SAIL TRIM – MAINSAIL
Mainsail trim on the J/70 is an important factor in getting the boat up to speed. Check each of these for proper mainsail setup:
1. Make sure the mainsail is at full hoist at all times. The head of the sail should be hoisted until even with the bottom edge of the white band at the top of the mast. This setting should be checked regularly as the halyard could stretch out during the day.
2. The tack of the mainsail is equipped with a strap that leads around the front of the mast. This tack strap should be tensioned so that the tack of the sail is held forward while under load from the outhaul. The tension is also important to keep the luff rope in the mainsail from chafing in the feeder or pulling out of the track completely.
REMEMBER to unclip the buckle when dropping the main. If the outhaul is on tight and the main is dropped, the buckle may break from excessive load created as the boom drops to the deck.
3. Correct batten tension for the three full-length battens is important to achieve proper mainsail shape. Each batten should be tensioned so that all the wrinkles are removed from the batten pocket and the batten can pop from side to side easily. If a batten is too loose, vertical wrinkles will appear along the batten pocket itself and if a batten is too tight, horizontal wrinkles will develop just above and below the batten pocket and it will be difficult to pop the batten from side to side.
4. Backstay Flicker –
Adding a backstay flicker to the mast crane can help the leech of the mainsail pass through the backstay when tacking and jibing in lighter winds. However, the flicker will also make it difficult to apply accurate backstay tension in medium wind. This can make it more difficult to keep the boat in the “groove” since your headstay tension will now be unstable. This decision comes down to personal preference although most of the top teams opt not to use one.
Trimming the mainsail on the J/70 is a balance between power and stalling. If the sail is trimmed properly, you will get the maximum amount of power out of the sail and if not trimmed properly, the sail could stall and your boat speed will suffer. The controls that most directly affect the trim of the mainsail are the mainsheet, the main traveler, the boomvang, the outhaul and the backstay. Here is what to check for each control when trimming the mainsail:
MAINSHEET TENSION
Mainsheet tension is the place to start for proper trim. In most conditions, the J/70 mainsheet should be trimmed so that at max trim the leech telltales at the top of the main are stalling 25-30% of the time. In light wind or when building speed these leech telltales should be flowing 80- 100% of the time.
BOOM HEIGHT
Boom height relative to the boat’s centerline, is another important factor in mainsail trim and the mainsheet traveler is the way to set the boom height properly. Until the boat becomes overpowered, the traveler should be set so that the boom is near the centerline of the boat while sailing upwind. It can be set slightly above center to help in pointing, but there is risk of stalling the sail. If the boat loses speed when the boom is raised above centerline, the traveler or the mainsheet should be eased to help return the boom to centerline and build speed. Pull the traveler all the way to the windward side of the track in very light air when you have no backstay on. When you are overpowered and have a lot of backstay on, the traveler car can be centered on the track.
BOOMVANG
When it’s windy enough that you need to ease the mainsheet to keep the boat flat, add enough tension on the boomvang that the boom goes out but not up when the mainsheet is eased. This enables you to keep tension on the leech while controlling the depth in the lower part of the main. We do not recommend over tightening your boomvang as that will cause the headstay tension to decrease, making it harder to sail in high wind. Remember to ease the boomvang before turning downwind. It will be difficult to steer the boat down if the boomvang is on tight.
OUTHAUL
The shape of the foot, and lower section of the mainsail can be changed using the outhaul. The outhaul should be set looser when the boat needs more power and tighter as the power increases. A good indicator of proper outhaul tension is the lowest batten. When the mainsheet is trimmed properly, the lowest batten will hook slightly to windward of the boom angle. If the lowest batten hooks too much, the outhaul might be too loose and if it is parallel with the boom, the outhaul could be too tight. You can also judge the distance between the foot of the main and the boom at its biggest gap. Usually the gap should be between 2”-6”.
BACKSTAY
The backstay is used to change the power in the mainsail but it also affects the headstay tension which controls the shape of the jib. Increasing backstay tension bends the mast and flattens the main while allowing the upper leech to open. It also tensions the headstay which flattens the jib. So more backstay tension equals less power and vice versa. Use the backstay to try to achieve your desired heel angle. Remember to adjust the gross-tune backstay as the wind and rig tune change in order to easily and accurately adjust the backstay control line in the cockpit. In maximum overpowered conditions, the gross-tune backstay adjustment should be pulled as hard as possible.
J/70 SAIL TRIM – JIB
Trimming the jib on the J/70 involves both technique and accuracy. Proper jib trim will help balance the boat and ultimately control the boat’s speed and pointing ability. While achieving the proper trim is the goal, being able to repeat the trim consistently will also make a big impact on your boat’s performance. The important factors in proper jib trim are the lead car position, jib sheet tension, in-hauler tension, jib halyard tension and reference marks to repeat all the settings. The final trim position for the J/70 jib is a balance between the sheet tension and in-hauler tension.
When the jib is trimmed in, the leech of the jib should be lined up with the spreader stripes as mentioned earlier. Within this range, your upper jib leech telltale should be flowing 100% of the time. Trim in until it just stalls then ease a hair until it starts flowing again. This is your max trim.
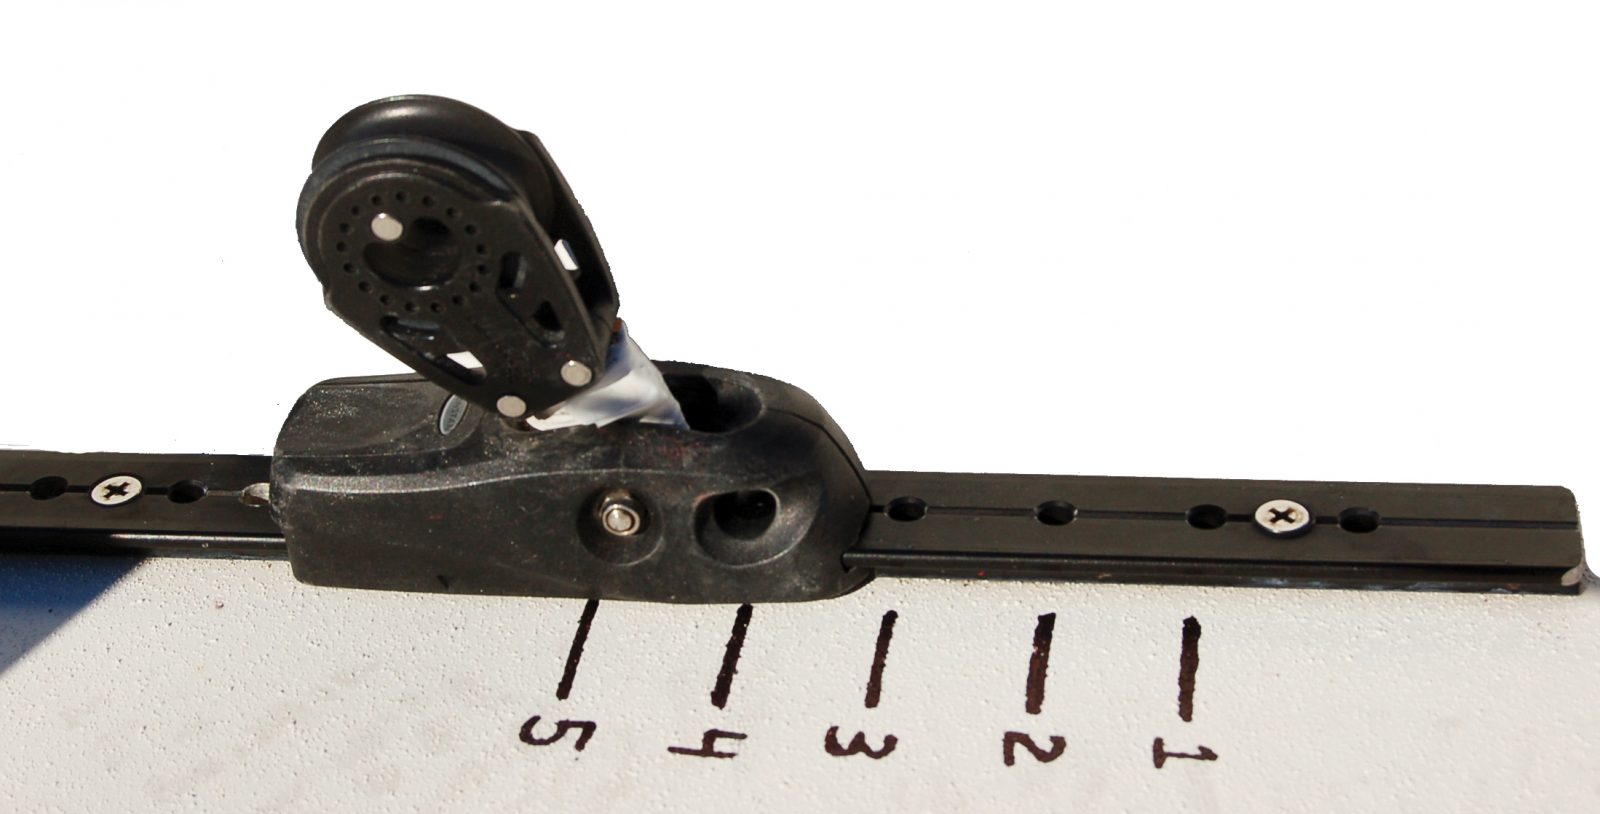
JIB CAR POSITION
The first step in jib trim on the J/70 is jib lead car position. Setting this position is important as it affects all of the other settings. Combining the jib lead car position with the amount of sheet tension, in-hauler and halyard tension allows the trimmer to manipulate the sail to fit the conditions and style of the skipper. As seen in the tuning guide it is good practice to find your BASE lead position as you will use this setting most of the time. This BASE position is heavily influenced by the rake setting you are using. From the BASE position you can adjust forward or back depending on the conditions. With our recommended base rake setting of 56”, we recommend a base jib lead position of 7. That’s 7 holes showing between the front of the car and the forward most factory screw hole in the track.
WINDWARD SHEET (In-hauler)
On the J/70, we use the windward, or lazy jib sheet as an ‘in-hauler’ to pull the clew of the jib to windward and more inboard. The more you in-haul, the deeper the bottom of your jib gets, and the more your leech closes. The further aft your jib lead car is, the more in-hauler you need to carry. When setting the in-hauler tension, our reference point is the location of the jib clew relative to the cabin house. Marks are helpful here as well. A good rule of thumb is to try to get the foot of the jib to contact the cabin house as much as possible to prevent air from slipping through the gap under the foot.
J-6 Jib: For the J-6 some in-hauler is always required unless trying to go really low and fast. In very choppy conditions, use less in-hauler with the clew directly above the corner of the cabin house and the lead forward. In light to moderate chop the clew can be 1” – 2” inside the cabin house with the lead at base setting. In very flat water the lead can go back more a little further with the clew in-hauled to 3” inside the cabin house.
J-2+ Jib: The J2+ requires a little less in-haul than the J6 since it is a fuller sail. However, in-haul is still effective and we recommend using it in most conditions. On average, the clew should live just above the corner of the cabin house, but in flatter water, it can be in-hauled 1” – 2” inside the cabin house.
JIB HALYARD
The jib halyard on the J/70 is rigged with a fine tune purchase that can be adjusted while sailing. In lighter winds, the jib halyard should be set so that there are slight horizontal wrinkles appearing in the first panel along the luff of the sail (approx. 4-8” back from the luff of sail). If wrinkles extend past the first vertical seam, your halyard is too loose. If there are no hints of horizontal wrinkles, your halyard is too tight. As the wind gets stronger, and the sails need to be de-powered, the jib halyard should be tightened just to the point where the wrinkles along the luff disappear. As the halyard is tightened and loosened, it is important to keep in mind that the halyard tension also affects the leech tension of the jib and the sheet and/ or in-hauler may need to be adjusted to compensate.
TRIM MARKS
Make reference marks on jib sheets for both the sheet tension and in-hauler tension. Having reference marks makes it possible to accurately repeat fast settings. It is a good idea to experiment with different settings for each control to get used to how each control affects the sail and how they interact with each other.
The basic effect of the three jib controls – lead car position, in-hauler and jib halyard is:
Jib Lead Car Position
Forward = Tighter leech, round foot
Aft = Open leech, flat foot
In-hauler
More = Tighter leech, round foot
Less = Open leech, flat foot
Jib Halyard
More = Flatter sail
Less = Deeper sail
After setting the sheeting position of the jib, the trimmer needs to constantly check to ensure the trim remains correct as the conditions change. Since the jib on the J/70 is high aspect (tall and thin) changes in the conditions have a significant impact on the trim of the sail. For this reason, there are telltales attached to the upper leech of the jib to help the trimmer know when the sail is going to stall. When the sail is trimmed properly for upwind, the leech telltales will be flowing and if the telltales begin to stall, the sail will need to be adjusted to regain the flow. Most often, only a small adjustment is needed to help return the proper trim and flow to the sail. The reference marks on your spreaders will also help with jib trim. You will find that in 10+knots in flat water you may be able to sheet so the jib leech is at the inside, 18” spreader mark and the leech telltale is still flowing. When it is light and lumpy you will find that the leech will need to be closer to the outside 22” spreader mark. Easing the jib sheet slightly is the first step in returning flow to the jib. Normally, this will only require an inch (or less) of sheet to be eased out. If the leech telltales continue to stall when the leech is sheeted into the spreader stripes, other adjustments need to be made to properly trim the sail. Since the telltales indicate the stalling of the upper leech of the sail, adding twist is likely the solution. The two ways to best achieve more twist in the jib, is to move the lead car aft and use less sheet tension. As described earlier, both adjustments will add twist to the sail and help regain the twist and flow at the top of the sail.
J/70 SAIL TRIM – SPINNAKER
Spinnaker trim on the J/70 is much easier than that of a conventional poled boat. Here are a few tricks that can make you faster downwind and make your sail handling easier:
DOWNWIND SAILING “MODES
Displacement Mode
Displacement mode is used under about 10 kts of wind. The main and the spinnaker are on the same side of the boat and the goal is to sail as low as possible without losing pressure in the spinnaker. The boat should be flat or a couple degrees heeled to windward. Body weight should be as far forward as possible. The spinnaker should be eased out in an effort to “rotate” the sail to windward around the headstay. The trimmer should ease the sheet until the luff curls and then trim slowly back in.
Lazy Plane Mode
Lazy Plane mode is often used in puffy conditions (10-15 kts) when you can easily plane in the higher wind range but just barely plane in the lower wind range. Body weight is to weather (but not hiking) and back so that the trimmer is just in front of the winch with the main trimmer directly behind the winch. The goal here is to maintain a heel angle of about 10-15 degrees and high enough to the wind that you can plane. This is a very difficult mode to maintain!
Full Plane Mode
Full Plane mode is used when the wind is consistently over 15 kts, and we can sail high enough angles at high enough speeds that the hull rises out of the water and rides on top of it. Crew weight needs to be all the way to weather and aft so the bow knuckle is constantly out of the water. Oftentimes the main trimmer needs to be behind the helmsman. It’s important to have the forward crew adjusting the boomvang to help control the power. If the boat gets overpowered and wants to broach, the vang must be eased!
Wing-On-Wing
Wing-On-Wing can be used in wind ranges of about 8-14 kts. In this mode, we sail dead down wind with the main and spinnaker on opposite sides of the boat. This is a difficult mode which requires a lot of concentration. The goal is to sail with the boat heeled to windward to help rock the spinnaker away from the mast. The trimmer must try to hold the clew of the spinnaker down and out to keep the sail as steady as possible. Be careful not to sail by the lee as that means the main will be between the wind and the spinnaker – collapsing the spinnaker. Try to sail dead down wind or slightly higher (very broad reach).
SETTING
The most efficient position to set the spinnaker is out the main hatch and between the shrouds and mast. With this method, the sail will need to be retrieved between the shrouds and mast, which will work with each of the different types of takedowns. When setting the spinnaker, the biggest concern is keeping the sail out of the water until it is hoisted. As the bowsprit is extended and the tack line pulls the sail out to the end of the bowsprit, a crew member should be assigned to guiding the sail out of the companionway while keeping the foot of the sail tight and up out of the water.
GYBING
When gybing, the boat is turned down slowly while the trimmer eases the spinnaker sheet until the clew is just forward of the headstay. At this point the trimmer overhauls the new sheet and completely releases the old sheet pulling the clew of the spinnaker around the headstay before the mainsail is gybed. Once the clew of the spinnaker is around the headstay, the boat is turned through the gybe and the mainsail is pulled across the boat to the new side. When timed correctly, the mainsail and the spinnaker will fill simultaneously on the new side. As the spinnaker makes it to the new side of the boat, the forward most crew can reach the clew of the sail right near the shrouds and pull quickly down on the clew (and then immediately let go) to help “pop” the spinnaker full on the new gybe.
SPINNAKER DOUSES
There are three basic types of spinnaker douses used on the J/70. The windward douse, the leeward douse and the gybe douse, sometimes called the ‘Mexican’. Each douse is different because of the approach to the mark and type of turn at the mark. Since the spinnaker is almost always set from the port side of the boat, each method will return the sail to the port side.
Approaching a port rounding on port tack will require a windward douse. Since the boat stays on port tack the entire time, the sail is released and retrieved on the windward side of the boat. To perform the windward douse, the boat is sailed lower to release pressure in the spinnaker and the clew of the sail is pulled around the headstay.
At this point the tack line is released, collapsing the spinnaker allowing the forward crew to gather the foot of the sail. Once the sail is under control, the halyard and bowsprit are released and the sail falls to the deck and is stored down the main hatch. This is also the proper douse when approaching a starboard rounding on port tack. In that case, the douse should be completed before reaching the mark so the gybe around the mark can be made after the spinnaker is retrieved.
Approaching a starboard mark rounding on starboard tack will require a leeward douse since the sail will be stored on the leeward side and the boat will not change tacks before the rounding. Before beginning the douse, the boat must be turned downwind to release pressure on the sail. After the turn down, the spinnaker is over trimmed so the forward crew can reach out to leeward to retrieve the sail. If the boat isn’t sailed lower during a leeward douse, the boat will likely want to tip over as the sail is over sheeted. When the foot of the spinnaker is over trimmed the forward crew should grab the foot of the sail forward of the shrouds (between the mast and lower shroud) at the same time the tack line is released. Once the crew has the foot of the sail under control, the halyard and bowsprit are released and the sail is gathered and stored down the main hatch. Because the sail is taken in on the leeward side, the crew needs to take care in pulling the sail aboard while at the same time keeping it from hitting the water. If the sail falls in the water, it is likely to ‘shrimp’ or fill with water and pull the rest of the sail over the side.
Approaching a port mark rounding on starboard tack, without room to completely gybe the spinnaker before the rounding, requires a gybe douse or ‘Mexican’. The gybe douse begins as a leeward douse and ends as a windward douse. The boat is sailed low and into a gybe on starboard tack, while the spinnaker is over trimmed on the port side of the boat. As the boat turns toward the mark and gybes, the crew grabs the foot of the spinnaker between the shrouds and mast at the same time the halyard is released, dropping the sail onto the foredeck. Once the sail is mostly down, the tack line and bowsprit are released and the sail is gathered and stored down the main hatch.
J/70 RIG TENSION QUICK TUNING CHART
| WIND SPEED | UPPERS (Turns from Base) |
LOWERS (Turns from Base) |
TENSIONS (Uppers/Lowers) |
TRAVELER POSITION | BACKSTAY |
| >6 | -2 | >-2 | 15 / Loose | 100% Up | 0% |
| 6 – 8 | -1 | -1 | 17 / Loose | 100% Up | 0-20% |
| 8 – 10 | BASE | BASE | 19 /9 Pre-bend =2″ | 50% -100% Up | 0-40% |
| 10 -12 | 2 | 2 | 21 / 13 | 40%-75% Up | 30-50% |
| 12 -13 | 3 | 3 | 23 /16 | 20% – 40% Up | 40-60% |
| 13 – 14 | 4 | 4 | 24 / 21 | 10% – 30% Up | 50-70% |
| 14 – 15 | 5 | 5 | 26 / 23 | 1 car length Up | 60-80% |
| 15 – 16 | 6 | 6 | 27 / 27 | 1 car length Up | 80-100% |
| 16 – 18 | 7 | 7 | 28 / 28 | 1 car length Up | 100% |
| 18 – 20 | 8 | 8 | 29 / 30 | 1 car length Up | 100% |
| 20+ | 9 | 8.5 | 30 / 32 | Centered – 1 car length down | 100% |
Rake = 56″ (1425mm)
*The number of turns is an estimate and is likely different from boat to boat. It is imperative to check your own boat for an accurate tuning matrix.
**The amount of rake you carry will also impact your pre-bend and turn matrix. Try to maintain pre-bend close to 2” – 2.5″.
J-2+ JIB TRIM QUICK TUNING CHART
| WIND SPEED | LEAD CAR POSITION | CLEW POSITION (In-haul) | HALYARD TENSION (Luff wrinkles) |
| >6 | Hole 4-5 | No in-haul | Wrinkles to first seam |
| 6 – 8 | Hole 6 | 1″ outside cabin house | Wrinkles half way to first seam |
| 8 -10 | Hole 7 – BASE | Directly over corner of cabin house | Hint of wrinkles |
| 10 – 11 | Hole 7 | 1″ inside cabin house | Hint of wrinkles |
| 12 -13 | Hole 7.5 | 2″ inside cabin house | Smooth luff |
| 13 – 16 | Hole 7.5 | 1″ inside cabin house | Smooth luff |
| 16 – 19 | Hole 7 | Directly over corner of cabin house | Smooth luff |
| 19+ | Hole 6.5 | 1″ outside cabin house | Smooth luff |
J-6 JIB TRIM QUICK TUNING CHART
| WIND SPEED | LEAD CAR POSITION | CLEW POSITION (In-haul) | HALYARD TENSION (Luff wrinkles) |
| >6 | Hole 6 | Directly above cabin house | Wrinkles to first seam |
| 6 – 8 | Hole 7 | Directly above cabin house | Wrinkles half way to first seam |
| 8 -10 | HOLE 8 BASE | 1″-2″ inside cabin house | Hint of wrinkles |
| 10 – 11 | Hole 8 | 2″ inside cabin house | Hint of wrinkles |
| 12 -13 | Hole 8 | 2″-3″ inside cabin house | Smooth luff |
| 13 – 16 | Hole 8 | 2″ inside cabin house | Smooth luff |
| 16 – 19 | Hole 7.5 | 1″-2″ inside cabin house | Smooth luff |
| 19+ | Hole 7 | Directly above cabin house | Smooth luff |
*All aspects of jib trim are largely dependent on the sea state and the strength of the wind relative to that sea state. You need to adjust your setting accordingly
**There are multiple jib car tracks on the market, these suggestions are based on the original tracks that came on American built hulls. Precise hole locations need to be established on your specific boat. These settings are also based on a RAKE of 56” [1425mm]. If you’re using less rake then your BASE jib lead will be further aft and vice-versa.
